Cookie Decorating

Did you ever wonder how you get that beautiful smooth surface on a sugar cookie? It is actually relatively easy to do. The key to getting that look is using Royal Icing. It dries hard and smooth, and makes a great surface for piping or adding extra detail.

Royal Icing Recipe

Ingredients:

3 egg whites
4 cups icing sugar
1 teaspoon cream of tartar
1 Tablespoon water
1 Tablespoon corn syrup

Beat egg whites until foamy. Add cream of tartar and beat well. Add the balance of the ingredients and beat until glossy.

Creating the Smooth Surface:

  1. Using a small round tip (#1), pipe around the exterior of the shape you wish to fill with some of the prepared icing.
  2. Take a portion of the Royal Icing you prepared and place it in a separate bowl. Thin it with water, adding only a few drops at a time. The consistency you are looking for is slightly runny. To check if you have the right consistency, use the “10 second rule.” Drag a spatula through the frosting to make a path. Count how many seconds it takes for the surface of the frosting to fill the path and become completely smooth again. It should take approximately 10 seconds… if it takes more time than that, your frosting needs more water added. If it takes less time, your frosting is too thin and you will need to stir in additional icing sugar to thicken it. This icing will be used to “flood” the interior of the piped shape. You can either carefully drop it from a spoon into the piped area and spread it to the edges, or fill a decorating bottle and use a round tip #2 to fill (flood) the interior. For a more in-depth tutorial, check-out this link.
  3. You will want to use a toothpick to pop any air bubbles that appear on the surface. It also helps if you very gently tap the cookie on the counter to help the icing smooth out nicely before setting.

Once the cookies have been flooded and the air bubbles removed, you will want to let the cookies set for several hours before adding any additional details to them.

*This icing is also ideal for holding the pieces together when making a gingerbread house.

If you are interested in learning to blog, do not miss this opportunity to learn how the pros blog with a revolutionary new blogging platform.  Click here to learn more.

Gift Wrapping Tips: Post 3

silver bows

I love purchasing these cheap little bow sets. They are so tacky and yet can be incorporated into an overall look that is very elegant. This particular package is a bit different from the bow in my example, but it came from a cheap set like this that I bought at the dollar store. I really like the “mesh netting” I used in the example below and am always on the look out for this particular style. The ones above work in much the same way, just a bit different look.

Pulling it all together:

  • These little boxes were purchased as a set (of 2 or 4?) from the dollar store.
  • I made the matching gift cards with a snowflake stamp and white ink on matching blue paper that I cut into circles. I added a button brad to the center and a few dots of glitter glue to add a bit of sparkle.
  • The embellishment on top consists of one of the dollar store mesh bows, opalescent shreds, basic white curly ribbon and a 6 -8 inch strand of wire holly garland twisted to give the look added dimension.

The above shots are all of the same gift, just different angles. I love the little flap on the dollar store box that also has a snowflake on it. So cute, for so little!

If you are interested in learning to blog, do not miss this opportunity to learn how the pros blog with a revolutionary new blogging platform.  Click here to learn more.

Stained Glass Cookies

I have seen many pins on Pinterest highlighting Stained Glass Cookies. I have never tasted a stained glass cookie, let alone made them, but really wanted to see if they were as simple as the instructions imply. Like most people, I have a basic list of recipes that I make every Christmas, but often add one or two new ones to the mix. In reading over several of the recipes, I noticed that the cookie itself seemed to be a pretty basic sugar cookie type of recipe. I have used the same Brown Sugar Cookie recipe for years and seldom try others, because these are so yummy. Of course, the finished cookie is slightly brown (darker) than a standard sugar cookie. I decided to use my own Brown Sugar Cookie recipe and then add the “stained glass” to it.

Brown Sugar Cookies

Ingredients:

1 cup of butter
1 cup of  brown sugar
1 teaspoon of vanilla
1 egg
2 1/2 cups of flour
1/2 teaspoon of baking soda

Method:

Preheat the over to 360 degrees. Cover and refrigerate for 1 to 2 hours, so that the dough is easier to work with. Flour your counter top and roll out dough. Press with a cookie cutter. Bake for 6 minutes.

Tips:

When rolling cookies, I use two sheets of parchment paper and stick the dough between them. I then roll out the dough by rolling on top of the top sheet. This creates a beautiful smooth texture and prevents the dough from sticking to the rolling-pin (if the dough seems to be super sticky, you may need to add a bit of flour or corn starch to the parchment paper to prevent it from sticking to the paper, but this is generally not necessary). Peel off the top layer and proceed to cut the cookies. I also find that it is super easy to remove the cut cookie from the parchment paper and transfer it to the cookie sheet. This avoids that mushy mess you get when you try to remove the cut cookie directly from the counter.

Sometimes I even roll my dough directly onto my stone. Place a layer of parchment paper over top and roll out the dough to cover the entire sheet or stone.  Cut the cookies so that you are leaving ample space between for baking. Once cut, peel off the extra dough from around the pieces and your cookies are on the tray and ready to go directly into the oven with no need to transfer them!

Stained Glass Cookies:

To make the stained glass cookies, simply use another cookie cutter (something small) to cut out the center of your cookie. (I was thinking that the base of a decorating tip would work well, but I didn’t think of it until after I had started mine, so I stuck with what I had started with).  Set the cut-out cookies (with holes in the middle) onto a foil lined baking sheet. Fill each hole with a mound of broken hard candies. I used Jolly Ranchers. I also tried one with a broken candy cane, but didn’t really like the look. Follow the baking instructions for the cookie recipe and let cool completely on the tray before attempting to remove them. Decorate as desired. I piped on some left over Royal Icing I had on hand from the gingerbread houses we made at youth group on Friday night. I found one star cookie in Google images that I really liked. I used it for my basic plan and then just got creative and did my own thing. A little whimsical and a whole lot of fun!

If you are interested in learning to blog, do not miss this opportunity to learn how the pros blog with a revolutionary new blogging platform.  Click here to learn more.

Gift Wrapping Tips: Post 2

I love all things pretty, but am also very frugal. Cellophane is one of my secret weapons when it comes to making gifts look great on a budget. Of course, you can pick-up a roll for a buck and get numerous bows out of one roll.

cellophane

I purchase printed cellophane, solid colours and also love the look of the clear.

 Cellophane Bows:

    • Purchase dollar store cellophane and cut off 2 to 3 strips. I generally make my strips the about 4 inches wide and the length is equal to that of the width of the roll.  The size can be altered to fit the size of the gift you are decorating.

      cut cellophane strips

      This bow was made with only two strips of cellophane.

    • Stack the strips.
    • Scrunch up the strips in the center so that the entire strip is gathered together in the center. (You know, similar to the tissue flowers we made back in the 70’s!) The YouTube video gives a great tutorial for making the tissue flowers, but these are much easier. Less layers, no folding (just scrunch), no trimming the ends to form a petal shape and less to pull apart after.

      Scrunch up cellophane

      Scrunch up the cellophane in the center of the strip, until the entire length of the strip has been gathered up.

    • With the center pinched tightly, tie a string or ribbon around the cellophane to secure it in the middle . You can tie it onto the gift at this stage or after the flower has been pulled apart. Regardless, the final step is to pull the layers of cellophane apart to create a very full looking cellophane flower.

I always incorporate a few other things to finish off the gift. In this case, the final look was made with these three items:

The thing I like best about cellophane is that you can create any kind of look you want depending on the colours and patterns you use. The ribbon and other embellishments can make you gift look fun or elegant, depending on what kind of look you are going for. Get creative and see what you can add to your gifts to dress-up a simple cellophane bow!

If you are interested in learning to blog, do not miss this opportunity to learn how the pros blog with a revolutionary new blogging platform.  Click here to learn more.

Ginger Snap Cookies

I am not quite sure why these are called Ginger Snap Cookies, there is no snap. These cookies are super moist and chewy, you know the melt in your mouth kind. I always make these at Christmas, but my family loves them, so we make them several times throughout the year as well. We are doing a baking evening and cookie exchange with Eden’s Girl Guide unit on Monday evening. I think baking 12 dozen cookies in two hours might be pushing it slightly. I think we’ll do a few batches on Sunday and leave a batch or two for the Monday evening baking blitz.

Ginger Snap Cookies

Ingredients:

Ginger Snap Cookies
2 cups of flour
1 Tablespoons ginger
2 teaspoons baking soda
1 teaspoon cinnamon
1/2 teaspoon salt
3/4 cup of shortening
1 cup sugar (+ extra for rolling balls in)
1 egg
1/4 cup molasses

Method:

  • Cream sugar and shortening.
  • Beat in egg and molasses.
  • Sift dry ingredients and add. Mix.
  • Form into small balls and roll in sugar. B
  • Place balls 2 inches apart on an ungreased cookie sheet.
  • Bake at 350 degrees for 10 to 12 minutes. (Cookies flatten themselves as they bake.)

WARNING!

Let cool and then place in freezer immediately to avoid the potential tummy ache that may result from eating the whole batch fresh out of the oven! No kidding, these have a serious addictive property and may result in weight gain.

Balloon Ice Lanterns

ice lanternA few years ago, I received a mold for making an ice lantern. It is really nice because you can add cranberries or pine branches and create a really beautiful piece. I make a few for our yard each year and often make a couple to give away. It is the gift that keeps on giving ~ thanks Joan!! I really wanted to create a series of ice lanterns for our front entrance, but with only one mold and several hours for freezing each one, I knew that it would be difficult to make a large number. I have seen a few “pins” on creating your own ice sculptures using balloons. I picked up a bag of balloons at the dollar store and proceeded to try my hand at making my own. Thanks to Willow Day for the great tutorial.

Balloon Ice Lanterns:

  1. Purchase balloons
  2. Slip the neck over a faucet or hose end and carefully fill to desired size.
  3. Knot the end.
  4. Set outside (or in the freezer) to freeze.
  5. The tutorial said to allow 4 to 6 hours for freezing time. I checked mine after 4 hours, 6 hours, 9 hours, 18 hours and then finally felt they were frozen to the desired stage after about 27 hours. (Another tutorial did suggest about 24 hours, so I was expecting it would take longer.)  You are wanting to freeze the outer layer only, but want it to be thick enough that it will not break too easily. The key is to “catch it” before the entire sphere freezes, as you will want to pour the water out of the center cavity because this will become the area in which you set your tea light candle.

Completed Balloon Ice Lanterns:

The outdoor temperature has been hovering around -17 degrees. Brrrr.  I think that the 27 hours was great, but another hour or two would have still been fine as there was still plenty of water in the center. I have lined them on my front porch and set out by the door. I will probably make a few more and of course, add one or two from the mold. I love how the balloon lanterns all freeze differently and thus each one is unique.  I had a really hard time capturing them in a photo. It is really cold and a bit snowy, and the wind keeps blowing my candles out. None of these shots do them any justice, but at least you get the idea. I think they’ll work beautifully on a calm clear evening. We’ll wish for that on Christmas Eve!

If you are interested in learning to blog, do not miss this opportunity to learn how the pros blog with a revolutionary new blogging platform.  Click here to learn more.

Gift Wrapping Tips: Post 1

I love to decorate gifts. Back in the “olden days” when I didn’t have so much on my plate, I would be done my Christmas shopping by the end of October and be completely wrapped and ready to go by the end of November. Sadly, I have hardly started this year. On line shopping is looking better and better all the time! Well, when I used to wrap early, I used a strategy that allowed me to store all of those wrapped gifts easily. Basically, I wrapped all the gifts in one sitting (or at least most of them). This would take me several hours, but I did not add any ribbons, bows, tags or embellishments at this time. I simply chose paper, wrapped and then wrote the person’s name (very small) on the bottom of the gift. This allowed me to stack and store oodles of gifts without having to compensate for the bows.  I would then set aside another an entire day or evening and set to work decorating each gift. I love to do this and I thought I’d share a few of my favourite tricks!

Wrapping on a Budget

First of all, I spend very little on wrapping paper and embellishments. I always purchase when the Christmas stuff is on clearance and for the last two years I’ve picked up beautiful wire rimmed ribbon at Michael’s for 90% off. I also purchase many of the items I use from the dollar store. The example I am sharing today includes mostly dollar store items.

For this particular project, I used dollar store wrapping paper and dollar store wire rimmed ribbon. I can’t remember if I bought the wire holly garland and metallic shreds at the dollar store or not, but probably.  I had both on hand from last year.

I tend to use primarily wire rimmed ribbon. I will occasionally use the curly ribbon, but most often to dress-up the embellishment a bit. I wrapped the gift with one band of ribbon and tied a nice big bow. I then slipped a bit of metallic shreds beneath the bow. The shreds are not silver or gold, but rather that clear “opalescent” look. (Don’t you love that word?)  I love how it just punches up the bow and seems to fill the dead space a bit. I then like to take a 6 to 8 inch piece of wire garland and slide it under the shreds and then twist it on top of the bow to hold everything in place. I like to leave the ends of the wire garland sticking out. This look is really easy to achieve and yet takes a simple ribbon and bow and kicks it up a notch. I often choose gift tags with a string. I just prefer the “hanging” look over stickers. Such is the case with this tag. I just looped it over the wire garland.

You already know how obsessed I am with re-using and re-purposing items, so I am sure you won’t be all that surprised to know that I collect the ribbons and bows on Christmas morning and re-use many of them the following year. I have even been known to leave the tags attached and use it for the same person. Thus, my stash of beautiful ribbons and bows does not need to be replenished that often.

Have you ever considered working from home? A revolutionary blogging system has hit the market.  If you are interested in learning how to blog and earn money from home, you need to click this link.

Pumpkin Chocolate Chip Loaf

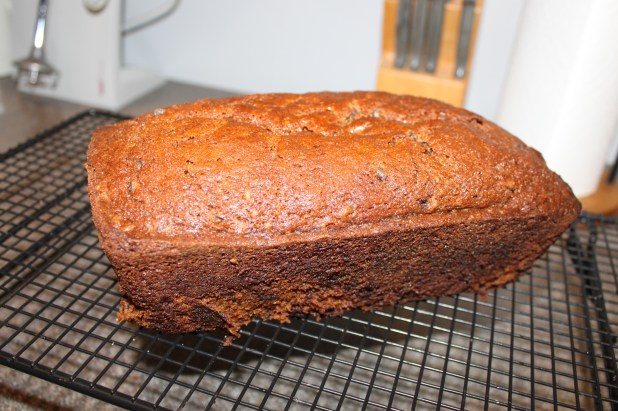
Okay, I am  officially hooked on all things pumpkin. I tried a new recipe for pumpkin loaf on Monday and my family devoured the first loaf in one day. Generally speaking, Eden isn’t overly enthused with most of my new recipes, in fact, sometimes I think it is her mission to “snub” them.  She will usually try my new recipes and often finish one serving, but rarely asks for seconds or offers any praise, despite the taste. Well, let me tell you this pumpkin loaf passed the “Eden test” with flying colours!  Not only did she gobbled up most of the loaf, but when I got home from work yesterday, she had already removed the second loaf from the freezer. She was raving about it and asked when I was going to make it again. I love the crusty texture on the outside and the moist “cake” on the inside of the loaf.  Slap on some butter and it’s like a give straight from heaven.  The loaf actually seemed to taste even better the second day. Is that even possible? This is a definite keeper and a must try ~ thanks to The Twisted Chef for another great recipe. (I believe the original recipe was found in Baked: New Frontiers in Baking by Matt Lewis and Renato Polafito.)

Pumpkin Loaf

Pumpking Chocolate Chip Loaf

Ingredients:

3 1/4 c. flour, sifted
2 tsp ground cinnamon
1/2 tsp freshly grated nutmeg
1/2 tsp group allspice
1/2 tsp ground ginger
2 tsp baking soda
2 tsp salt
1 3/4 c. pumpkin purée
1 c. vegetable oil
3 c. sugar (She used 1 c. white & 2 c. brown)
4 eggs
1 tsp vanilla extract
2/3 c. water, room temperature
1 1/2 c. chocolate chips

Preheat your oven to 350 F. Spray two 9 inch loaf pans with non-stick spray. Set aside.

In a medium bowl, whisk together the flour, cinnamon, nutmeg, allspice, ginger, baking soda and salt. Set aside. In another, larger bowl, whisk together the pumpkin purée and the oil until combined. Add the sugar(s) and whisk again. (There seems to be quite a bit of sugar in this recipe, but it does make two nice sized loaves, so I guess it isn’t so bad.) It’ll thicken nicely – now add in the eggs, one at a time, whisking after each addition, and then add the vanilla. Add the water and whisk until combined. Grab your rubber spatula and stir in the chocolate chips. Gently fold in the dry ingredients – try not to over mix.

Divide the batter between the two loaf pans. Gently tap the pans against the counter – it’ll remove any air bubbles and level out the top of each loaf. Bake at the centre of the oven – about 1 hour 20 minutes (give or take) – a toothpick or tip of knife should come out clean when inserted in the centre.

Transfer the pans to a wire rack, cool for about 15 minutes; then invert the loaves and cool completely. And then slice into it.

pumpkin loaf

This delicious pumpkin loaf recipe was borrowed from the Twisted Chef. Mmmm good!

If you are interested in learning to blog, do not miss this opportunity to learn how the pros blog with a revolutionary new blogging platform.  Click here to learn more.

Quick and Simple Christmas Decor

I saw this idea at church on the weekend and the jars looked so pretty. I loved the simplicity and thought it would be easy to replicate. No word of a lie, once I had the supplies home this project took me less than 5 minutes to put together.  At church they had many of these lining the tables in the lounges. It looks beautiful. I just made one for now, but may end up making more. They would make a cute little gift as well.

Christmas Mason Jar Materials:

  • old mason jar
  • wire (Dollar Store)
  • “snowflakes” (Dollar Store)
  • battery operated mini lights
  • optional embellishments (The ones at the church were plain, but I bought a pack of bells, some Snowflake ornaments and some Christmas ornament hooks to add some embellishments.)
  • Fur mat (optional) ~ the jars at church were sitting on a white fur mat and I loved the look.  I picked up some faux fur with my trusty Fabricland membership discount card (I love that card.)

*I love the dollar store. It’s true, you do get what you pay for and must be mindful that the quality will generally be poor, but it is much like thrift store shopping. You are looking for items with “good bones” or structure. I buy most of my Christmas wrapping paper at the dollar store and often incorporate tacky ornaments and decorations into projects and my gift wrapping. Such was the case with the items I purchased to dress up this jar. It is amazing how you can take something that you might otherwise consider very cheap and unappealing and then configure it into something spectacular!

Christmas Mason Jar Project:

  • Wrap the wire around the neck of the jar and then loop it over the top to form a handle. Twist the ends of the wire on both sides of the jar. (1 minute)
  • Put batteries in the lights and shove in the jar. (30 seconds)
  • Dump “snow” on top. (30 seconds)
  • Slip an ornament hook through the twisted wire on one side of the jar and thread on one of the snowflake ornaments. (1 minute)
  • Hook a bell on each end and give the wire a bit of a twist to secure it. (1 minute)
  • Set the jar on the fur mat and turn on the lights. (This actually takes about a minute because you have to squeeze your hand in the jar to get to the switch).
Mason Jar Project

Here is the finished project.

Finished mason jar project

This angle shows you how I used the “s” shaped ornament hook as a feature in the finished project. I love the design of the hook.

snowflake lights

Here are the snowflake lights with two of the snowflakes pulled off.

*I found a set of the battery operated mini lights at the dollar store. They were a buck and I knew they were $4 at Canadian Tire, so I felt it was worth the gamble. I didn’t really like the “snowflake” bulbs and wasn’t impressed when they gave off a blue light instead of the soft white I was expecting. However, I easily slid the snowflake portion off the end and the blue didn’t look quite so bad. I may still pick-up a set of white lights. So simple and pretty.

If you are interested in learning to blog, do not miss this opportunity to learn how the pros blog with a revolutionary new blogging platform.  Click here to learn more.

Winter is Here!

We had our first snow fall a few weeks ago and it looks like it is here to stay. I actually hate the cold and am generally not a big fan of winter. I would miss having snow at Christmas, but other than one snowman making session and a few toboggan rides, I would be fine to skip winter all together. However, in some ways, it is almost a relief when the cold weather finally settles in and the snow is here to stay. I find that transition time in the spring and fall is a killer when you have limited storage space. When the weather is bouncing up and down like a yo-yo, it seems as though you have every coat you own in use and there is no room to house all of the clothes. You know, the light jacket for nice days, the winter gear for the bitter cold and the rain jackets for the very damp and rainy days. Every day seems like a new adventure and in Manitoba that means being prepared for what ever weather happens to come our way. So, with winter here, I was finally able to store all of our fall gear and clear some closet space.

I decided to put some of my thrift store purchases to the test and incorporate them into my plans to store our winter accessories more effectively.

Thrift Store Purchases…Repurposed:

curtain ringsYou may remember my post from last week which highlighted a few of my recent thrift shop finds. I picked up two wrought iron plant hangers. We mounted the larger one inside our front closet door and have it stuffed full of mittens and hats. There are little iron scrolls on the bottom that I slipped some old curtain rings on for our scarves. These are the same rings that I used on the scarf rod in my closet make-over and for the wet mitten rack below. I am so glad I hung onto those rings….they’ve come in very handy!

I also purchased a little “welcome” sign for 99¢. I had been planning to make a little place to hang our wet mittens and thought I could use the sign for my project. Typically, the radiator at our front door gets stacked with wet gear and is a bit of an eye sore. I thought that a little hanger sitting over top of the radiator would be a bit more visually appealing, but still take advantage of the radiator to dry the wet mittens.

mitten storage

This was are previous storage system!

Mitten Storage Solutions:

I basically took a wooden hanger from the basement (they were left by the previous owners) and sanded it down. It was in good condition, but I wanted it to have a bit of a darker stain.  I used some stain I had on hand to create a bit more of an aged look. I then gently removed the bottom bar of the hanger and slid on my curtain rings. I hammered the nail back in to secure the bar.

I took the little “welcome” sign and sanded it down to reveal some of the wood beneath the paint. I added some stain to the exposed wood and then topped it with a coat of paint. Once dry, I gently sanded the painted layer and applied a bit more stain to distress it slightly. I hand painted the word “MITTENS” and added a few dots to embellish the ends of the sign. Finally, I used some scrap fabric to make a tiny pair of little red mittens to dress up the sign. I used a blanket stitch to finish off the cuffs of the tiny mittens and tied them together with a string, so that they could hang over the buttons I glued onto the sign.  Here is a great tutorial for doing a blanket stitch. I love the look of a blanket stitch as it is a simple way to give a project a more “finished” look.

Mitten Storage Reveal:

You can see that the plant hanger does not provide a neat and tidy solution. It is inside our closet door, so I am okay with the messy look. What I love is that there is an actual “place” for the kids to put their mittens. They can now be held responsible for putting them away when they get home and in turn find them more easily when they are set to go out again. We have not had a chance to try-out the mitten hanger yet, but hopefully this will free up the top of the radiator!

Have you ever considered working from home? A revolutionary blogging system has hit the market.  If you are interested in learning how to blog and earn money from home, you need to click this link.